PersistenceSniper: hunt persistences implanted in Windows machines
PersistenceSniper
PersistenceSniper is a Powershell script that can be used by Blue Teams, Incident Responders, and System Administrators to hunt persistences implanted in Windows machines. The script is also available on Powershell Gallery.
The Why
Why write such a tool, you might ask. Well, for starters, I tried looking around and I did not find a tool that suited my particular use case, which was looking for known persistence techniques, automatically, across multiple machines, while also being able to quickly and easily parse and compare results. Sure, Sysinternals’ Autoruns is an amazing tool and it’s definitely worth using, but, given it outputs results in non-standard formats and can’t be run remotely unless you do some shenanigans with its command line equivalent, I did not find it a good fit for me. Plus, some of the techniques I implemented so far in PersistenceSniper have not been implemented into Autoruns yet, as far as I know. Anyway, if what you need is an easy-to-use, GUI-based tool with lots of already implemented features, Autoruns is the way to go, otherwise, let PersistenceSniper have a shot, it won’t miss it 🙂
Use
Using PersistenceSniper is as simple as:
PS C:\> git clone https://github.com/last-byte/PersistenceSniper
PS C:\> . .\PersistenceSniper\PersistenceSniper.ps1
PS C:\> Find-AllPersistence
If you need a detailed explanation of how to use the tool or which parameters are available and how they work, PersistenceSniper’s Find-AllPersistence supports Powershell’s help features, so you can get detailed, updated help by using the following command after importing the module:
Get-Help -Name Find-AllPersistence -Full
PersistenceSniper’s Find-AllPersistence returns an array of objects of type PSCustomObject with the following properties:
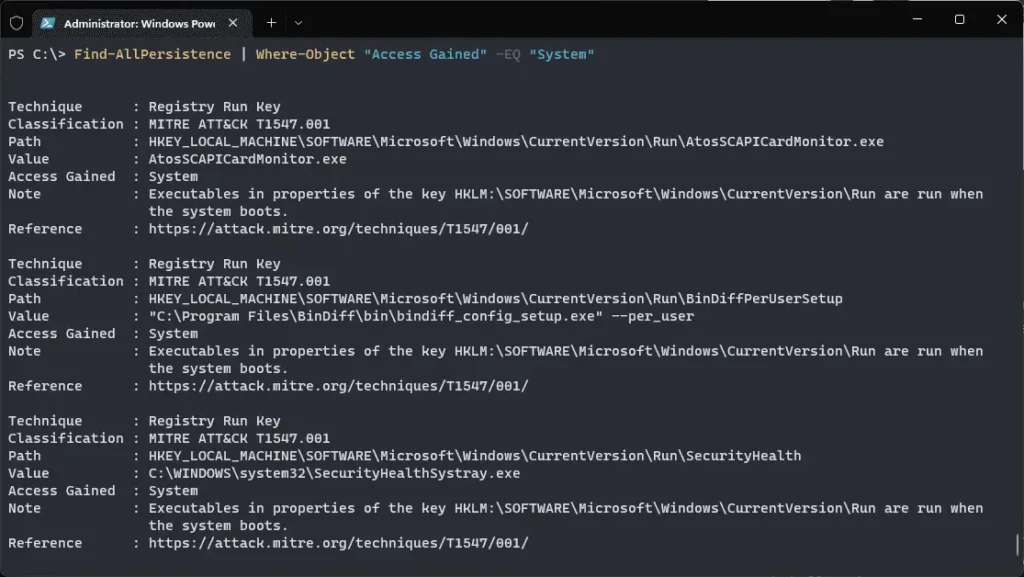
This allows for easy output formatting and filtering. Let’s say you only want to see the persistence that will allow the attacker to regain access as NT AUTHORITY\SYSTEM (aka System):
PS C:\> Find-AllPersistence | Where-Object “Access Gained” -EQ “System”

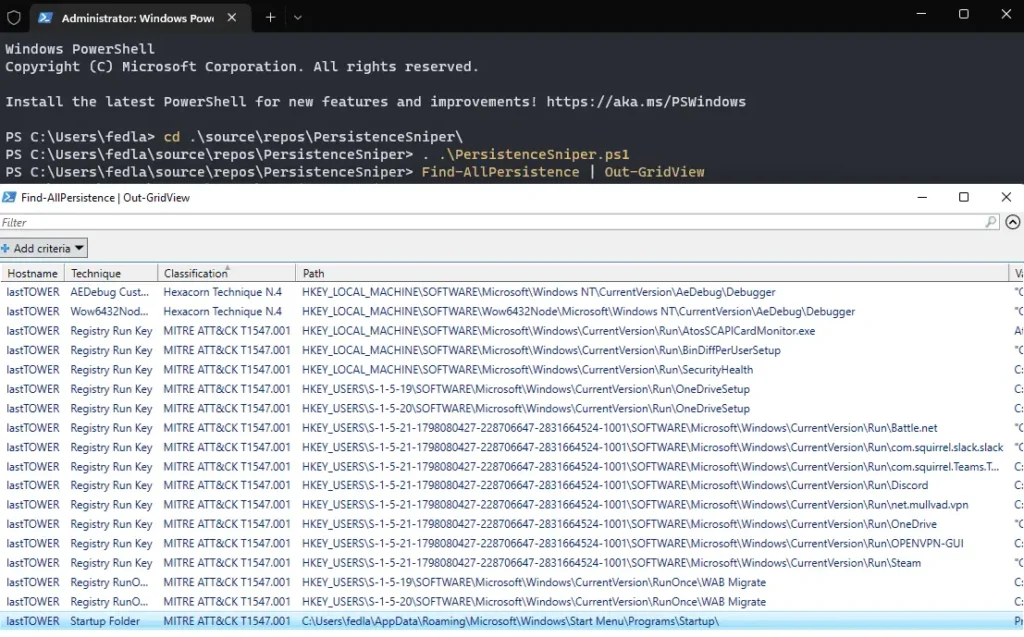
Of course, being PersistenceSniper is a Powershell-based tool, some cool tricks can be performed, like passing its output to Out-GridView in order to have a GUI-based table to interact with.

Interpreting results
As already introduced, Find-AllPersistence outputs an array of Powershell Custom Objects. Each object has the following properties, which can be used to filter, sort, and better understand the different techniques the function looks for:
- ComputerName: this is fairly straightforward. If you run Find-AllPersistence without a -ComputerName parameter, PersistenceSniper will run only on the local machine. Otherwise, it will run on the remote computer(s) you specify;
- Technique: this is the name of the technique itself, as it’s commonly known in the community;
- Classification: this property can be used to quickly identify techniques based on their MITRE ATT&CK technique and sub-technique number. For those techniques which don’t have a MITRE ATT&CK classification, other classifications are used, the most common being Hexacorn’s one since a lot of techniques were discovered by him. When a technique’s source cannot be reliably identified, the “Uncatalogued Technique N.#” classification is used;
- Path: this is the path, on the filesystem or in the registry, at which the technique has been implanted;
- Value: this is the value of the registry property the techniques use, or the name of the executable/library used, in case it’s a technique which relies on planting something on the filesystem;
- Access Gained: this is the kind of access the technique grants the attacker. If it’s a Run key under HKCU for example, the access gained will be at a user level, while if it’s under HKLM it will be at a system level;
- Note: this is a quick explanation of the technique so that its workings can be easily grasped;
- Reference: this is a link to a more in-depth explanation of the technique, should the analyst need to study it more.
Source: https://github.com/last-byte/


